Where to next?
If you ask most photographers, “What’s the best camera to use?”, 9 times out of 10 we will tell you, “The one you have on you”, and it’s true! It’s great to have a professional camera, but these days you can get A LOT done with the camera we always have on us, our phones. So before you go out and spend a ton of money on a brand new camera, let’s talk about how to take better photos with your iPhone.
Resolution + Quality
Let’s start out by understanding the settings behind our iPhone camera. Right out of camera, our iPhones create pretty high resolution images, but if you would like to ensure that your quality settings are correct for your needs, you’ll have to check your iPhone camera settings.
If you head over to SETTINGS > CAMERA > FORMATS in your iPhone, you’ll see two options; High Efficiency + Most Compatible. Both of these options are handy in their own way, so read what they do below and decide what works best for your needs.
High Efficiency Vs. Most Compatible
- High Efficiency: Creates a file with the name HEIF/.HEIC or .HEVC
- PROs:
- File size is usually about half the size of a .JPEG. thus being the better option for storage space on your device or your cloud subscription.
- Supports a larger range of colors (16bit vs the 8 bit in the JPEGs) and so devices with a wider color gamut may display a “better image” (of colors).
- Reads varying depth levels of images and could allow for more editing flexibility.
- It can store multiple images within a single file, which could be beneficial for live photos.
- Required for 4k video at 60 fps + 1080p at 240fps video (because of the file size of these types of videos)
- CONs:
- Slight reduction in quality of image, loses some details and sharpness (especially in low light situations)
- Auto converts to a JPEG when transferring to any device or program that does not support HEIF. If it does stay a HEIF file on transfer, it will still increase in file size.
- When converted to a JPEG, it can further compress and lose quality
- Compresses video
- Could run into issues with compatibility in different programs or editing software.
- PROs:
- Most Compatible: Creates a file with the name .JPEG or H.264
- PROs:
- Already in JPEG format and is easily compatible with all photo platforms
- Better Quality Image overall – Although the “resolution” is the same for both JPEG and HEIF files, the quality of smaller details may be better in the JPEG. This is more important for someone doing fine editing or focusing in on small details like hairs, eyes, skin, etc.
- CONs:
- Larger file size
- PROs:
- Note: If you want to take photos in “Most Compatible” mode (JPEG) but also want to be shooting 4k 60fps/1080p 240fps (Slow motion), you will have to be mindful to switch back and forth between the two formats options.

Lighting
This is something to keep in mind with not only iPhone photos, but all photos. Lighting could make or break an image. Lighting tells a story and emits the overall feeling of an image (or video).
Exposure
Choosing the correct lighting also helps the quality of that image. For instance, if an image is “blown out” or “over exposed”, meaning too bright and loosing details in the brighter areas of the image, it could be near impossible to bring those details back when editing the image. This creates a lesser “quality” image.
To adjust exposure/brightness while taking a photo with your iPhone, tap on the area you want to focus on until a yellow focus square pops up, then you can drag your finger up and down to adjust the brightness of the image.
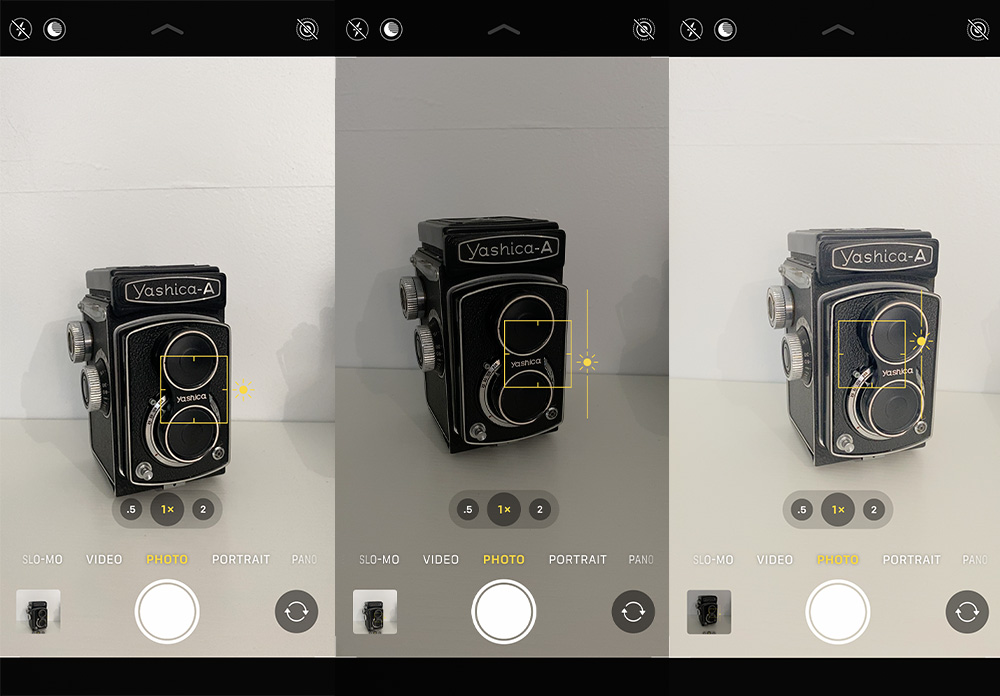
*Please note: When it comes to art and creativity, rules are made to be broken, but if the goal is to create a crisp “high visual/digital quality” image, then these rules would most likely apply.
As a rule of thumb, in digital photography, it is usually easier to make a slightly darker image brighter than it is to make an over exposed image darker.

Use Less Apps
Love editing on your phone? Amazing! Just try to narrow down your tools to one or two apps. (ideally one)
When you export an image from an editing app (more so on apps that do not allow you to edit export settings), it tends to reduce the quality and compress the image. Therefore, more apps = less quality.
One of my favorite apps for editing on my phone that has mostly everything I need is Snapseed.
Other awesome ones include Lightroom Mobile + VSCO
Clean Your Lens
There is nothing worse than a foggy lens! It happens to the best of us, but take the time to clean off that lens because it TRULY makes all of the difference in phone images.
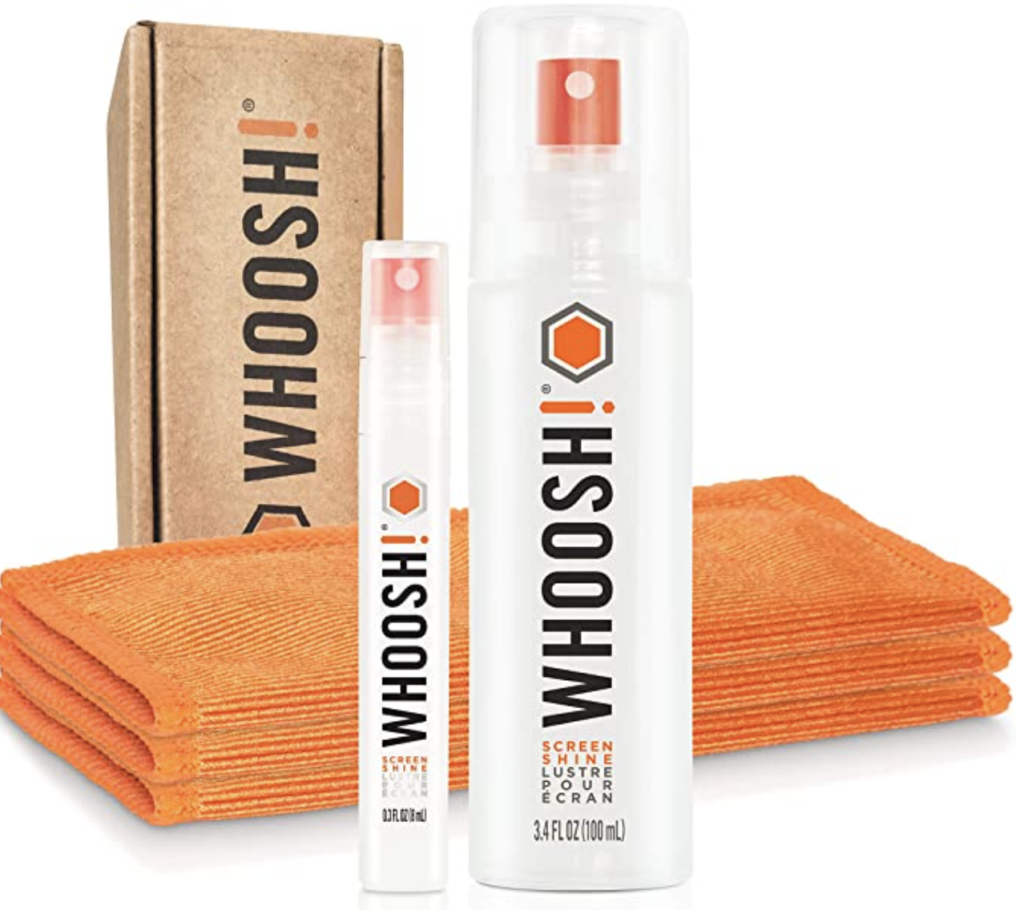
If you like to clean off your screen and lens often, I recommend using a cleaner made for those surfaces so that it doesn’t damage any of the glass over time.
This one is my favorite for all of my devices including my laptop:
Ditch the Zoom
Whenever you zoom on an iPhone, it’s the equivalent of cropping to zoom in on an image (A.K.A try to make a smaller image bigger), thus majorly reducing the quality of the image.
Portrait Mode Adjustments
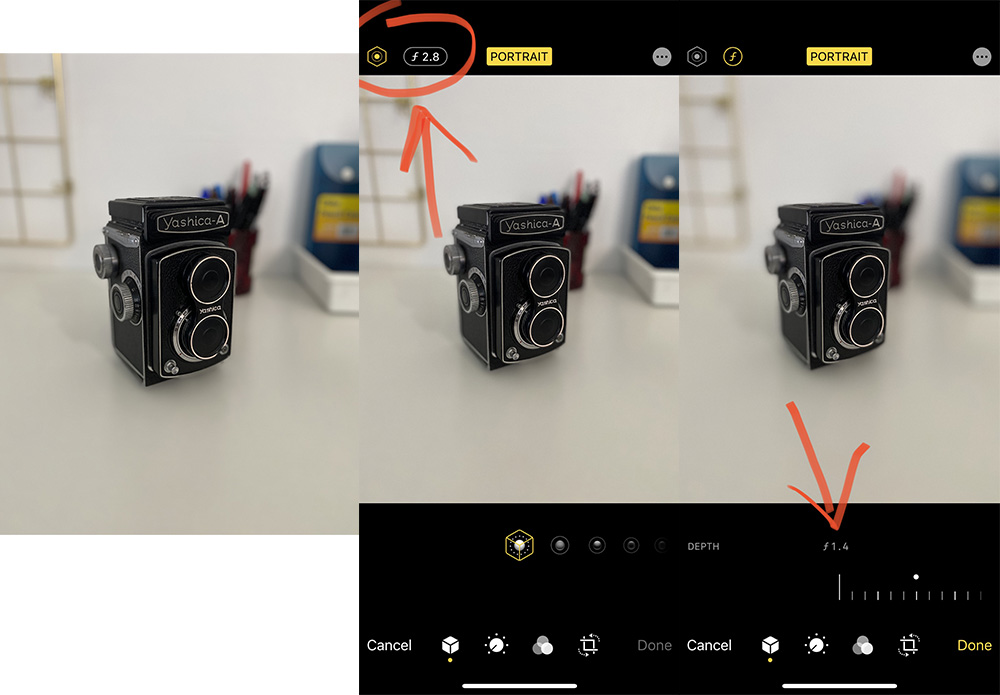
Portrait mode on the iPhone has changed the game for phone photography. With portrait mode, you are able to imitate the “blur” or “bokeh” that usually can only be achieved with a good quality camera lens. But did you know you can adjust the intensity of that blur?
The “F Stop” on a camera is the setting that controls how much of that “blur” you get in an image and how much of that image is in focus. On your iPhone, you can go to a portrait photo you have already taken, tap the button next to the “f” number (or f-stop), and then slide the bottom slider to your desired “f-stop” or “blur/bokeh” intensity.
Shooting in RAW Format
A more advanced option for capturing images on your phone, is to do so in RAW format. RAW is a file type used mainly amongst professionals or those wanting to have the most flexibility in the editing process. RAW files are only supported in certain editing softwares, so be sure to do your research before trying this one out. RAW files are more commonly captured on professional cameras in addition to JPEGs or in place of JPEGs and edited in programs such as Adobe Lightroom, Adobe Photoshop and many other professional programs.
Two of my favorite apps for capturing RAW images on my phone are Halide Camera + ProCam. Both come with a one time purchase fee.
Sending Your Photos
There are tons of ways to send and share your images with others, but some options are better than others when it comes to image quality.
Copy + Paste vs “Share”
If you copy and paste an image, it also copies the image size and details. This is great if you are looking to keep the quality intact. When you “share” an image via a “share” button or option, there is an auto compression to the image. Great for storage, quicker transfers, and general web use and viewing.
iMessage
When you send images via iMessage, they are auto compressed during transfer, so keep that in mind. If you are focusing on quality retention, you may want to choose another option.
Airdrop
Airdrop is an amazing way to transfer high resolution/quality images and videos quickly without any auto quality compression.
Cloud Storage/Transfer
Finally, aside from airdrop, the easiest way to transfer images or videos efficiently, without losing quality, is by way of cloud storage. There are tons of options out there for cloud storage, you just need to find what works for you! Some of my favorite options are:
- iCloud
- Drop Box
- Google Drive
- Box
Using Your Photos on Social Media
A common misconception about posting images on social media is that the higher the resolution, the better the image will be. But unfortunately, that is not the case.
Social media platforms like Instagram, Facebook, and many others have size requirements for their images. If the Image is not the appropriate size, the platform will automatically compress and resize it for you, but that often times reduces the visual quality of the image significantly.
Do yourself a favor and resize your images appropriately for the platform you are posting on. You can do a quick Google search to find out what size you need. Also, here are a couple of links to get you started. 🙂
Social Media Resize Cheat sheet:
https://makeawebsitehub.com/social-media-image-sizes-cheat-sheet/
Instagram Sizing Cheat Sheet:
I hope this helps you up your game in your iPhone photography! Be sure to tag @infulldetail in your new photos so I can check them out!
Looking for more education on photography, social media, or business + personal development? Let’s chat! Shoot me an email through my contact form.
Did you enjoy the images in this post? Check out my print shop 🙂

